Note: This post was originally written by Andreas Handel and copied here on March 26, 2021 - see the original post here for a potentially updated version.
Photo by Clovis Cheminot
The following blog post provides step-by-step instructions for creating a website using R Markdown, the distill R package and GitHub.
Motivation
The distill R package is a fairly new R package from the RStudio folks, it is under heavy development. One of its purposes is to create simple but still somewhat flexible websites. If you are trying your first website, or just need a fairly simple one that is quick to set up, this is a good place to start. To see a few examples of websites created with distill, check out the cleverly named the distillery website.
Required skills
I assume that you have general computer literacy, but no experience with any of the tools that will be used. Also, no coding, web-development or related experience is expected.
What this document covers
This document is meant to provide you with the minimum required instructions to get your own website up and running quickly. As such, instructions and background information are kept at a minimum. I used a recipe-like approach by giving hopefully detailed and specific enough instructions to get things to work. I’m not covering any why here or provide much further explanations. If you decide you like to use this setup for your website, you will likely want to go beyond this document and learn a bit more about the various tools involved in the process. To that end, links to further resources are provided.
Who this is (not) for
This way of making and hosting a website might be for you if:
- You are (or would like to be) an R, R Markdown and GitHub user. This is a method of creating a website using those tools which very efficiently fits into such a work flow.
- You want a way to host a website where all the content is fully controlled by you, and the website can be hosted without much resources (and for free).
- You want something that’s fairly simple and easy to set up and maintain, but still gives you some ability to configure things.
This way of making and hosting a website might not be for you if:
- Your main work flow is MS Word, Powerpoint, etc. and you are not interested in R Markdown or GitHub.
- You want everything accessible through a graphical interface.
- You need a complex setup with lots of control over layout and many advanced features.
Related content
I previously posted tutorials describing two other ways of making a website using a similar set of tools.
One rather simple way to set up a website is using R Markdown and Github without the distill package, I described this approach in this blog post. That approach is rather similar to the one described here. The advantage of using distill is that it’s likely going to see more development and will allow more configuration down the road.
If you need the ability to do more customization, you can use the blogdown R package and Hugo. I wrote a 2-series blog post with instructions for creating your own website using blogdown, Hugo and Netlify. (Here are Part 1 and part 2). While I’m using Hugo/blogdown for my personal website I have been using a basic RMarkdown/Github setup for my online courses, such as this one.
Quick tool overview
The tools used here are fairly simple. GitHub is used for hosting the website and R and RStudio, together with some packages (most importantly the distill package) are used to create the site.
Pre-requisites
First, you need to install R and Rstudio and set up a GitHub account. (That does not count toward the 30 minutes of getting the website up and running 😁.)
Install R and RStudio
If you don’t already have it on your computer, install R first. You can pick any mirror you like. If you already have R installed, make sure it is a fairly recent version. If yours is old, I suggest you install a new R version.
Once you have R installed, install the free version of RStudio Desktop. Again, make sure it’s a recent version. If you have an older version, you should update.
Installing R and RStudio should be fairly straightforward. If you want some more details or need instructions, see this page (which is part of an online course I teach).
Get GitHub up and running
If you are new to GitHub, you need to create an account. At some point, it would also be useful to learn more about what Git/GitHub is and how to use it, but for this purpose you actually don’t need to know much. If you want to read a bit about Git/GitHub, see e.g. this document, which I wrote for one of my courses..
Install Gitkraken (optional but assumed)
There are many ways you can interact with Git/GitHub. I mostly use the fairly user-friendly and full-featured Gitkraken. You can get a basic version for free. If you are a student, you can get the Pro version through the Github developer pack, teachers can get it through the Github teacher toolbox. If you qualify for either, I highly recommend signing up. But you don’t need it for our purpose.
Once you have your GitHub account set up and Gitkraken installed, make sure you connect Gitkraken to your Github account.
I assume for the rest of the post that you are using Gitkraken. If you have your own preferred Git/GitHub client (e.g. the one that comes with RStudio), you can of course use that one too.
Starting your website
Ok, the 30 minute timer starts now 😁. With the above registration and installation bits out of the way, you can get started with your website. To do so, follow these steps:
- Open RStudio.
- Install the distill package by typing
install.packages('distill')into the R console. - Choose
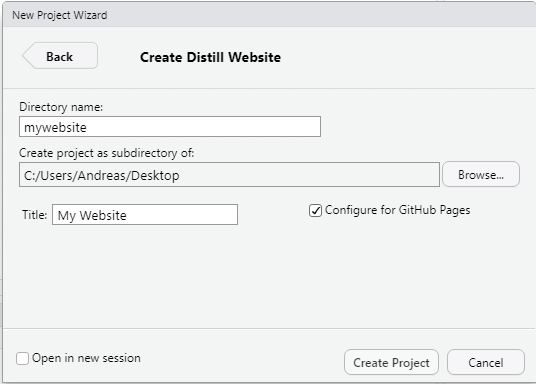
File -> New Project -> New Directoryand find theDistill Websiteentry. If it’s not there, close and re-open RStudio and make sure thedistillpackage installed ok (e.g., by callinglibrary(distill)in the R console and making sure there is no error message). - In the menu that opens, provide the name for your website project (this will also be the name of the URL on GitHub, so choose something informative). Decide where to locate it on your local drive. Don’t place it somewhere were it gets synced with e.g., Dropbox, OneDrive, Google Drive. This can mess with the GitHub work flow. Give it a title and check the
configure GitHub Pagesbox, as shown in the figure.
Test the website
Once you created the project following the steps outlined above, RStudio should restart itself and you should see 3 files open in the RStudio file pane (top left) namely index.Rmd, about.Rmd and _site.yml. In the top right pane, you should see a tab called Build. Click on it, then click on the Build Website hammer icon. Alternatively, you can type `rmarkdown::render_site() into the R console.
If you don’t find the Build Website button or the rmarkdown::render_site() command produced an error message, something went wrong with the setup. You can try to close RStudio, navigate to the folder for your website you just created and click on the .Rproj file, which should open RStudio and place you in the project. Maybe the Build tab and Build Website buttons are now there? If not, revisit the steps above and make sure you did them all, especially make sure the 3 starter files are in the same folder.
If things work, a preview window should open with the beginning of your new website. You’ll see a menu at the top, you can click on the links. Not much will happen just now, we’ll get to this.
A brief explanation of your new website
Your website is fairly simple and consists of these documents.
The file index.Rmd
This is the main landing page of your website. It always needs to be there and you fill it with the content you want on your main page. It should have opened in RStudio, if not, click on it (in the lower right File section of RStudio) to open it. You will see some stuff at the top between the --- symbols, that’s called the YAML header and is used for formatting. In this case, we are using the distill format for output. This is a type of R Markdown. If you are new to R Markdown, you can learn more about it on the R Markdown website. I also have a discussion of R Markdown and reproducibility on one of my course pages. You’ll find additional links to potentially useful R Markdown (and Github) resources there. Details about the distill version of R Markdown are here.
The file about.Rmd
This is another R Markdown file with so far little content.
The file _site.yml
This short file (called a YAML file) contains the main settings for your site that control the overall look. It also defines the structure, i.e. the menu bar at the top of your site. We’ll edit this file shortly.
The docs folder
This folder is created and updated when you build the website. It contains the html files that are created from your Rmd files. Those files will be used by Github to display your website (we’ll do that below). Note that you can change the folder name in _site.yml, but I recommend leaving it as is, since docs is also the default location for Github to look for these files.
Additional content
There is an .Rproj file that is used by RStudio to store information about your project. Later, we’ll add a few more additional files.
Creating and editing content
Making new content for your website is very easy, all you need to do is edit existing or create new R Markdown (.Rmd) files. Note that if you don’t use R code in your file, you could just use plain Markdown/Md files, but I find it easier for consistency to always use Rmd files, even if they don’t contain R code.
Let’s create some content. Open the index.Rmd file and write some introductory text at the bottom of the file, below the YAML header. Something like This is my new website, it’s going to be awesome! or whatever you like to write.
Then open the about.Rmd file and also write some text, e.g. provide an introduction that describes you. if you want, add a picture, as e.g. described here.
Finally, let’s create yet another file. Go to File, New File, R Markdown choose as output format HTML document and give it a title and name. Let’s call it Projects. A template will open. Replace the output: html_document line in the YAML with output: distill::distill_article
Also delete the existing content (or keep it at the bottom if you want to see how it looks when compiled). Then write some placeholder text, e.g. This is where I will list my cool projects. Save this new page as projects.Rmd into the main folder of your website.
Another option for creating new files, which I usually use, is to go into the website folder, make a copy of an existing file and rename. E.g. copy projects.Rmd to newpage.Rmd, then open and edit. Either approach works.
Now we need to include the new page you created into the overall site by adding it to the navbar section of _site.yml. Open that file, and in the navbar section below the current About entry, add
- text: "Projects"
href: projects.html
Warning! YAML files or YAML headers are very picky about the exact formatting, and the number of leading empty spaces. Often, if you change something in those files and the site doesn’t compile, it means you forgot to add the required empty spaces or added more than you should. Always check that the spacing is correct.
Here, make sure your new navbar entries is exactly positioned like the entries above it.
Once edited the _site.yml file, save all your files, then rebuild the website. If things work, the preview window should show up, and you should now see the text you wrote and be able to click on your new Projects entry. (You’ll find the newly created html files in the docs folder.)
Editing the look
As mentioned above _site.yml controls the look. You already edited it by adding something to the navigation bar.
To do major style changes, distill uses CSS, which is the standard of styling for any website. At some point, you’ll likely need to mess with CSS a bit (it’s easy) to get exactly the look you want. For now, we’ll take a shortcut and get and apply a theme someone else wrote.
The website of Emi Tanaka (who I do not know personally) is one of the sites featured on the distillery. Her website is here. As of the time of this writing, she has a theme with different fonts and colors. The theme is controlled by a CSS file for her site. You can get it by right-clicking here and doing a ‘save link as’. Save the file (which should be called theme.css into the main directory of your new website.
After you have done that, go to the _site.yml file and add theme: theme.css as a new line under the title line. Save, rebuild your website, and you should see it looking differently.
Since the promise was that we’ll get a website going in 30 minutes, we won’t do any more styling now 😁. As you start customizing your look more, you might want to start read the section Creating a Website section on the distill website.
Making your site public on GitHub.
The final step involves getting your site onto GitHub so it can be turned into a public website. For the following, I assume you have GitKraken up and running. If you are familiar with Git/GitHub and use your own workflow, adjust accordingly.
Gitkraken
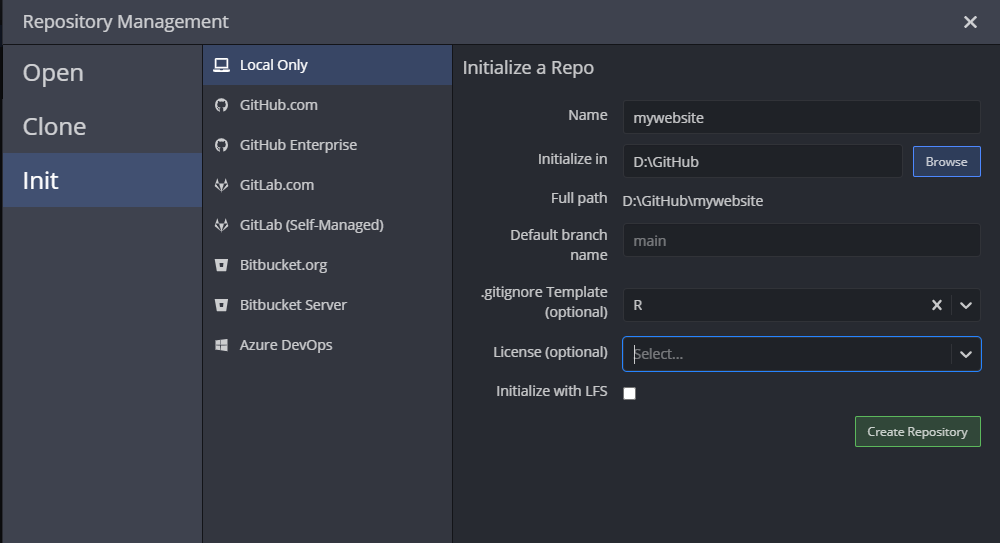
- Open GitKraken, go to
File -> Init Repo -> Local Only. Give it the name of your main website directory, e.g.mywebsite. TheInitialize Infolder should be the folder above where you created the website, such that theFull pathentry is the actual location of your website on your computer. For.gitignore Templateyou can chooseR. The rest you can leave as is.
Once done, click Create repository. You should see a bunch of files ready for staging on the left. Click Stage all changes enter a commit message, commit. Then Click the Push button.
At this point, if you didn’t properly connect GitKraken and GitHub previously, you’ll likely get an error message. Follow the error message and the connect Gitkraken to your Github account information to get it to work.
You’ll see a message about no remote existing and if you want to add one. Say yes. A menu on the left should show up. Make sure the repository name is the same as your website folder name. Then click the green button. If things worked, your local website folder has been sent to GitHub and is ready to be turned into a website.
Github website
For the last step, go to your account on Github.com and find the repository for the website you just created. On the bar at the top, in the right corner there should be the Settings button. Click on it. Scroll down until you find the GitHub Pages section. Under Source, select Main and then choose /docs as the folder. Don’t choose a theme since we are using our own. Save those changes. If everything works (it could take a minute or so), your website is now live and public! Look right underneath the GitHub Pages section, there should be something like Your site is ready to be published at https://andreashandel.github.io/mywebsite/. Click on the link and your new site should show up.
That’s it. Now the hard part starts, creating good content. 😄
Next steps
You’ll likely want to create content and change the look. See the sources listed below.
You might also want to update the
Readme.mdfile which is the file people see when they land in your GitHub repository for this file. I suggest adding a link to the website.
Updating your site
This process is fairly simple, you just need to remember to go through all the steps.
- Make any changes to files you want to make. Create new Rmd files in the main folder, edit them. If you include new files or rename them, don’t forget to change your
_navbar.ymlfile. - Rebuild the website by either clicking the
Build Websitebutton inside theBuildtab in the top right R Studio pane, or by typingrmarkdown::render_site()into the console. - Push your changes to GitHub.
- Wait a minute or so, then reload your website on Github and check that things look right.
More Information
Since this setup is based on R Markdown, the R Markdown book is very useful and contains lots of relevant information, especially this section. There is also the newer R Markdown cookbook which is more of a how-to guide, while the R Markdown book is more of a full reference book. Both are very useful sources of information.
The distill website is the obvious place for additional information on the
distillpackage.Look at the examples shown on the distillery website. If you see something you like, look at their GitHub repository and their code to see how they do it.
In my teaching, I use the Github/R Markdown workflow. Therefore, I have some information and links on that topic. You can browse through the website of this course and look for relevant content. The exercises teach parts of Github and making web pages (in fact, going through this tutorial is part of an exercise 😃.
Some tips, tricks and comments
Here are some thoughts and suggestions that I’ve learned by using this general setup for several online courses (previously I didn’t use the distill setup, but these comments still apply).
Every time you build your website, everything gets recompiled. If you have simple content, and no/little R code, that’s ok. If you are having materials that take long to run (e.g. complex R code inside your website), I suggest to move the R code from the Rmd file to a separate R script and save results from the code into files (figures/tables/Rdata files). Then load those results into your Rmd file. This way you only need to run the time-consuming R code if those parts have changed, but on a standard website re-build the code won’t need to run. There is also a way to set up your distill website as a blog that doesn’t lead to everything being recompiled. See here for more.
Sometimes when I use this workflow to build websites on a Windows computer, things slow down markedly. It turns out that Windows Defender is at times not working right. If you encounter a very slow re-build process on a Windows machine, this could be the issue and you might want to check out this discussion and especially the provided link which explains how to potentially fix it (the fix worked for me).
You can have files other than Rmd/Md in your main folder, and you can have files in sub-folders. Those are ignored by
rmarkdownwhen the site is built. Having those can be useful for storing additional materials. I generally have amediafolder in which I place figures and other materials, and link to it from my Rmd files.If you use this setup for teaching and want to slowly release content to students (while still making edits to later parts of the course), I recommend using a staging setup. A simple way to do that is to make 2 repositories, the main one for the course, and one where you do the development. Note that even if you set this to a private repository, if you turn on
Github Pages, students could find it. That’s usually not a big deal, nobody is looking. But you might want to be aware of it. With 2 repositories, you can do the testing/development of the course in the staging repository. Once things work and whenever you want to release new content to the students, you copy it over to the main repository, build it there and push it to the main course repo. Alternatively, you can do development in the main repository, as long as you don’t make the files visible in thenavbarsection, students won’t easily see them. Of course the files can be found through a direct link or through browsing the Github repository, so don’t place anything in there (e.g. if you use this four a course, keep the solutions to your homework problems offline until after the deadline 😄).It’s easy to have broken links when creating any website and it’s good to check that things are ok. There are simple free tools out there that let you check to make sure links are not broken. I like using Dr Link Check or the W3C Link Checker. I’m sure many others exist.